Mobile
The Unconventional Guide to Custom Ringtones for iPhones
Tired of the stock ringtones in your iPhone? Don’t feel like paying for one? I can’t blame ya. Here’s how to create a custom ringtone.

Just a heads up, if you buy something through our links, we may get a small share of the sale. It’s one of the ways we keep the lights on here. Click here for more.
Remember when people had to pay for ringtones? Is that still a thing? Honestly, I don’t even know if this is something people still pay for.
If you’re one of the last human beings on earth that still pay for ringtones, I have a solution. Kind of like how caveman discovered fire.
Here’s how to make any song your iPhone ringtone:
In order for this to work, you’ll have to decide a song you’ll want to set as your ringtone. Figure out which part of the song you want keep and write down the start and stop time.

Photo courtesy of Huffington Post
Right click on the song you selected and “Get Info.”

Photo Courtesy of Huffington Post
Click on the options tab. If you remember from earlier, I had mentioned earlier to write the start/stop times. Enter in those numbers and click OK.
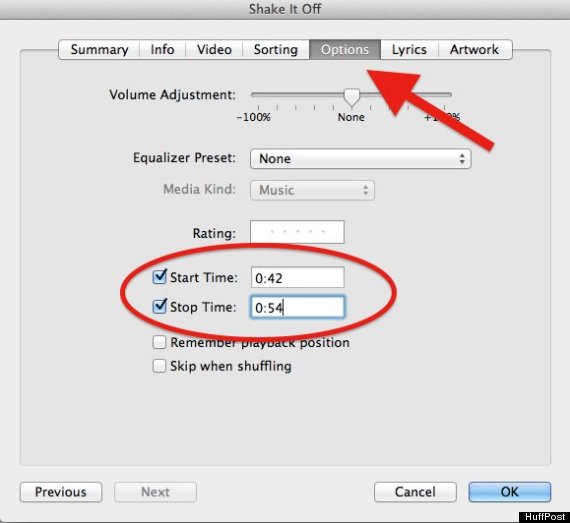
Photo Courtesy of Huffington Post
Give the song a listen and make sure its starting and stopping where you originally selected in the first step.
After confirming the length of the ringtone, right-click on the song and select “Create AAC Version.” Once you select that, two versions of the song will be available in your iTunes library.
You’ll want to right-click on the new file. Click on “Show in Finder” for Mac, or “Show in Windows Explorer” if you’re running on PC.
Again, you’ll right-click on the new file and select “Get Info” and rename it with .m4r. The file needs to be in this format so it can work as a ringtone.
It will ask you for permission once you hit enter, just make sure you use the .m4r option.
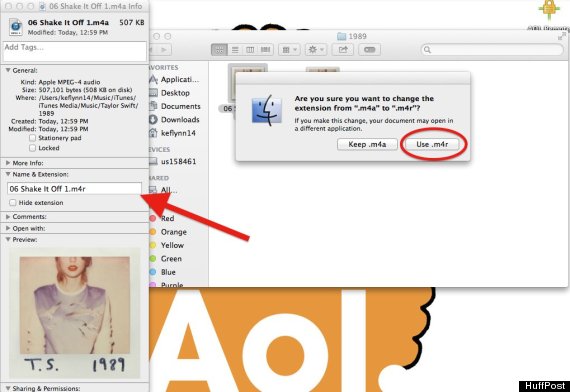
Photo Courtesy of Huffington Post
Drag the .m4r file to your desktop. You’ll want to go back into iTunes and delete the snipped version of your ringtone. Right click the song to delete.
Drag the file that you had moved to your desktop back into your iTunes under Music. The ringtone will appear in your tones section.
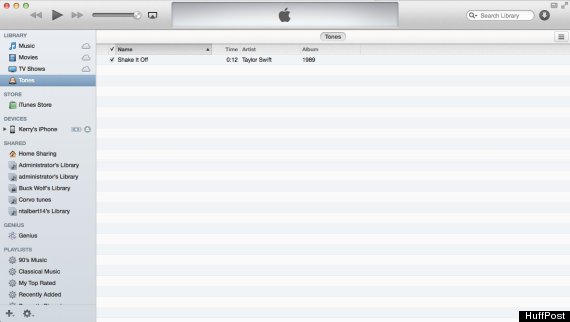
Photo Courtesy of Huffington Post
Now you just need to do infamously sync your iPhone to your computer. In your iPhone menu on iTunes, go to Tones and select “Sync Tones” then hit sync and apply.
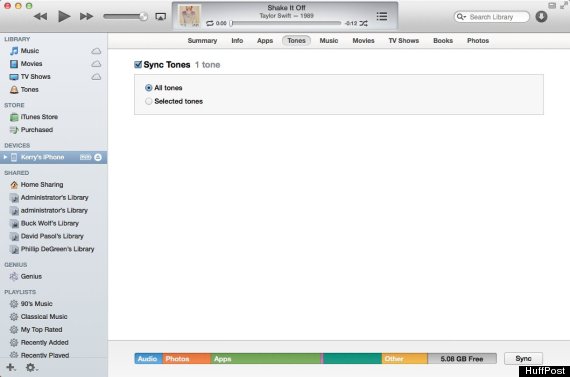
Photo Courtesy of Huffington Post
You’re pretty much there. Now all you’ll have to do is go into your iPhone settings and select it as your ringtone.

Photo Courtesy of Huffington Post


