Apple
How to download iOS 13 on your iPhone or iPod Touch right now
Don’t forget to create a backup!
Just a heads up, if you buy something through our links, we may get a small share of the sale. It’s one of the ways we keep the lights on here. Click here for more.
Apple’s latest mobile operating system, iOS 13, is finally out of beta. That means it’s time to update your iPhones to get all the myriad of improvements, but most importantly, to get system-wide Dark Mode. I mean, let’s face it – Apple’s grey UI is kinda blinding at night.
Here’s how to perform the update safely:
[If you own an iPad, the process might be different as they will now run iPadOS. We’ve got a handy guide to update that too, so check it out]
Prepare yourselves (and your devices)
Compatibility check
Okay, so you might be itching to get some upgrade action going, but first things always gotta come first. Not every Apple device is going to be able to run iOS 13, even if you were able to update to iOS 12.
That means if your device isn’t on this list, you’re stuck on whatever iOS version you’re currently on:
- iPod Touch (7th generation)
- iPhone SE
- iPhone 6S and 6S Plus
- iPhone 7 and 7 Plus
- iPhone 8 and 8 Plus
- iPhone X
- iPhone XR
- iPhone XS and XS Max
(iPhone 11 and Pro models come with iOS 13 out of the box, so they’re not on this list)
Time to call in some backup
READ MORE: RIP: Apple is discontinuing the iPod Touch
Nobody should do a major system update without a backup of their data. Even if it goes well, there might be some bugs that wipe your treasured memories. Apple makes it easy though, with multiple options from iCloud to iTunes.
Use the power of the cloud
Okay, if you’ve got enough space in your iCloud account, that’s the easiest way. Just… don’t do it while you’re on mobile data, your monthly bill will hate you.
Here’s how:
- Connect to WiFi
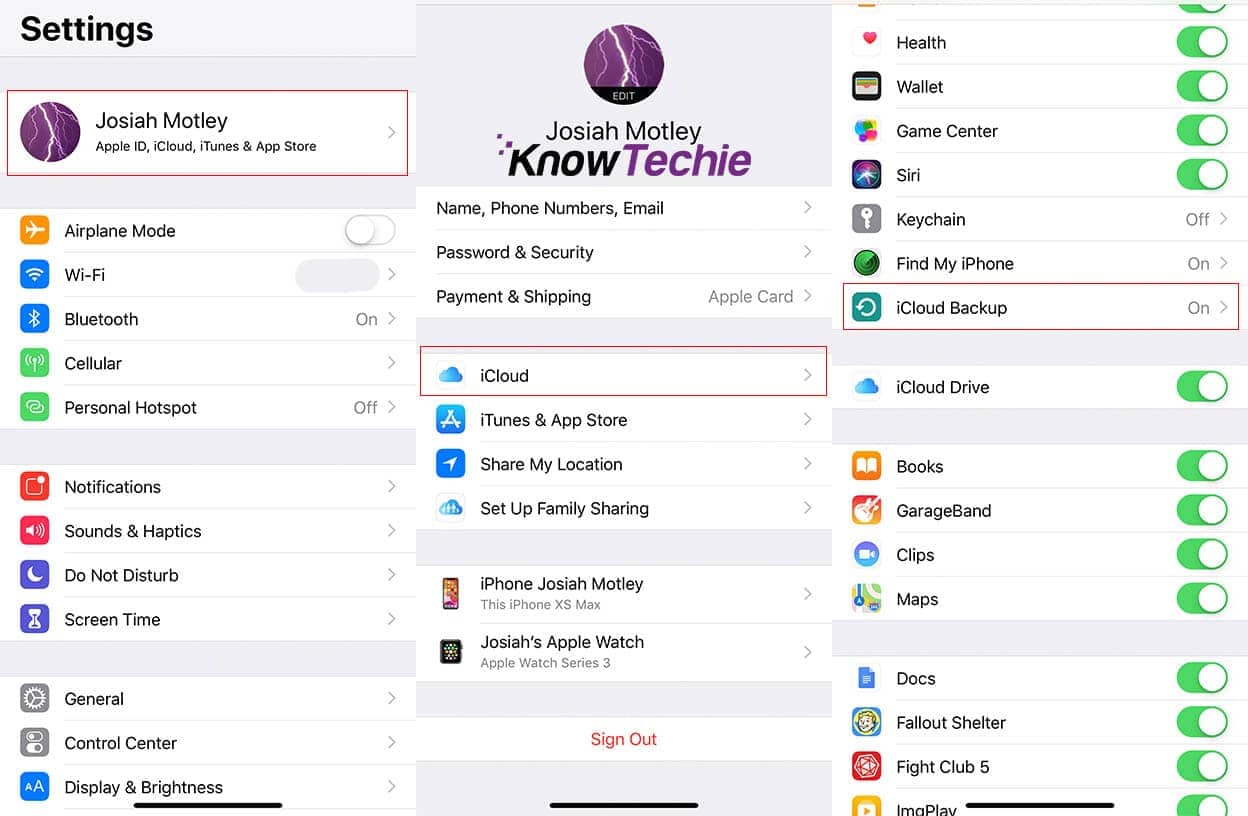
- Head to Settings, then tap on your name, then select iCloud. (if you’re on iOS 10.2 or earlier you’ll need to scroll down to find iCloud)
- Scroll down on this page until you see iCloud Backup > Back Up Now. (iOS 10.2 or earlier users will just have Backup to tap here)
That’s it, just let it run. You’ll know when it’s finished because you can check at Settings > iCloud > iCloud Storage > Manage Storage. Tapping on your device in the list will say if the backup is finished or still in progress.
Back it up on your Mac (only for macOS Catalina):
The iconic iTunes took a dirt nap in MacOS 10.15 Catalina, turning into Books, Podcasts, and Music. That doesn’t stop you using your Mac to back up your iOS devices though, so here’s how to do that:
- Connect your iPhone or iPod Touch to your Mac
- Unlock your iDevice, including any device passcodes or Trust This Computer prompts
- Open Finder, find your iPhone or iPod in the sidebar, tap on General then click on Back Up Now to manually back up everything to your Mac
If you have iTunes on your PC, or an older Mac:
If you still have iTunes, you can back up your iOS devices through it as you’ve been used to.
- Make sure iTunes is the latest version and connect your iOS device to your PC/Mac
- If you get any prompts for unlocking your device or Trust This Computer, follow them
- Select your iPhone or iPod Touch in iTunes
- Click on Back Up Now to save your precious
memeserr I mean documents
Once your backups are complete, follow these steps
Now that you’re backed up, the easiest way to get iOS 13 onto your device is over the air.
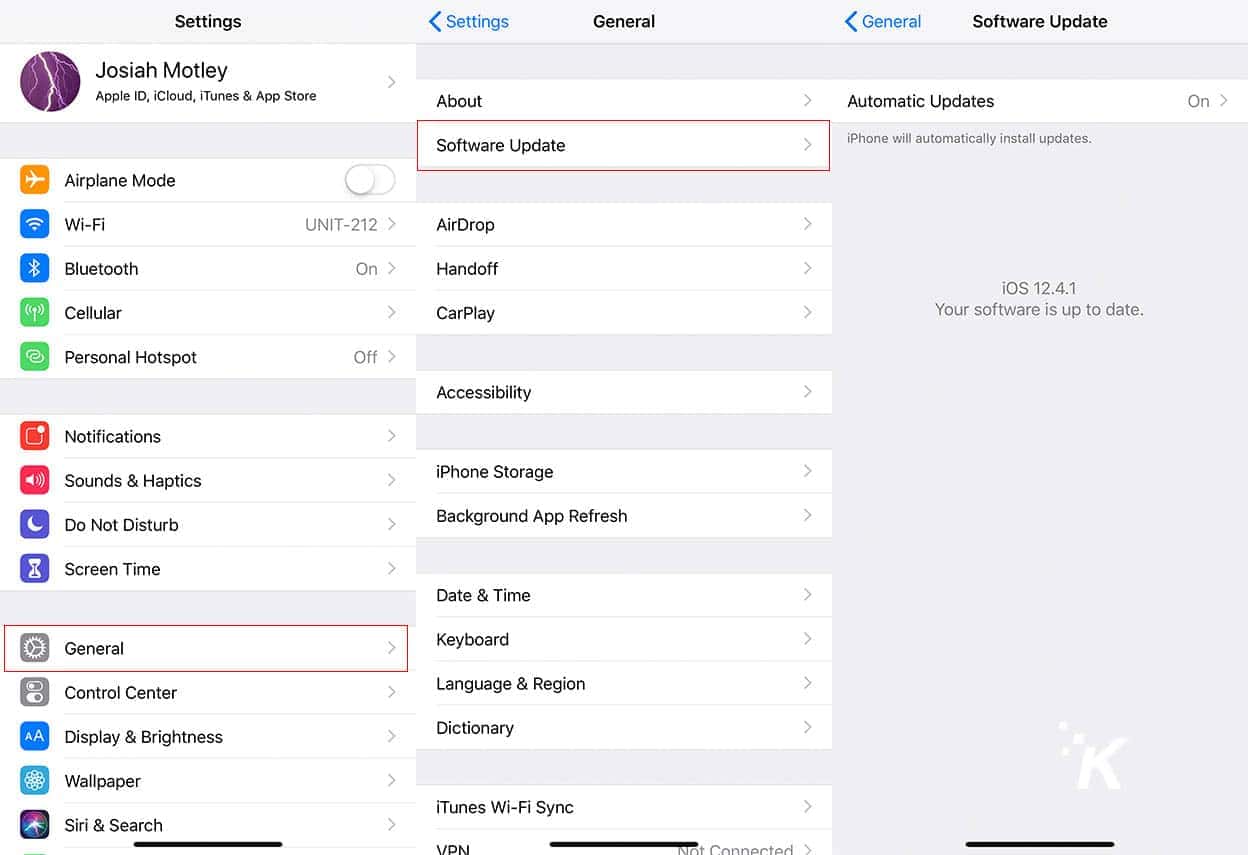
- Pick up your device and go to Settings > General > Software Update
- Your device will spend a minute searching, and probably pop up a notification about iOS 13. Tap Download and Install
- Wait for your device to update. This could be a while, so go watch a movie or empty the dishwasher or something
Downloading through your Mac or PC
If you still have iTunes, you can use that to update your iOS device as well
- Open the latest version of iTunes
- Attach your iPod or iPhone to the computer
- Select your device in iTunes, then click on Summary > Update
- Click on Download and Update when you see the iOS 13 message
Now your devices are updated to iOS 13, go into Settings > Display & Brightness > Appearance > Dark to change to system-wide dark mode for the UI. Your retinas and Retina displays will thank you.
Have you updated to iOS 13? Did you have any issues with the process? Let us know down below in the comments or carry the discussion over to our Twitter or Facebook.
Editors’ Recommendations:
- So, maybe, Apple just sucks at wireless charging?
- Facebook will use human contractors to listen to your Portal voice commands
- Smart TVs continue to send sensitive information to third parties
- Google Maps is starting to test a much needed incognito mode
Follow us on Flipboard, Google News, or Apple News


Review Roundups
Review roundup: Samsung Galaxy Z TriFold