3D printing
Review: Anycubic Photon Mono – an amazing 3D printer for beginners
An affordable, entry-level 3D printer.

Just a heads up, if you buy something through our links, we may get a small share of the sale. It’s one of the ways we keep the lights on here. Click here for more.
[letsreview postid=”138023″]
With people spending more time at home and quickly running out of ideas on keeping the family entertained, a 3D printer could be a great solution for families.
But don’t set yourself back thousands of dollars with an industrial level machine. Today, you can find a printer for mere hundreds that can sit comfortably in your home office or bedroom.
Personally, I’ve never had the chance to work on a 3D printer first-hand—I’ve only seen industrial ones at work during business conferences of maker workshops. So when I was offered the chance to review the latest Anycubic Photon Mono, which launched in Fall 2020, I didn’t hesitate.
What comes in the box?

The Photon Mono is pretty simple to put together as it comes near-enough already made. I was really surprised by this because normally you’re faced with IKEA-style flat pack instructions and hours of hard work.
The box includes:
- User manual
- Toolset
- USB drive
- Scraper
- Resin vat
- Platform
- Service card
- Glove
- Funnel
- Power adapter
- Disposable mask and gloves
Buyers also have the choice to buy resin and a wash and cure machine on the website.
For me, there was nothing missing, and it was straightforward to get started. However, without the resin, the machine is next to useless, so I was disappointed to see that resin wasn’t included in the basic package.
A funky, not bulky, design

This machine might not be the cheapest option from Anycubic, but for $269 it’s less expensive than other brands.
I love the neon yellow design of the top cover of the 3D printer—it’s perfect for my colorful home. It also sets it apart from its competitors from a design perspective. You’d be forgiven for thinking it’s a lamp or vase if looking from the corner of your eye. Though, I can appreciate it might not be to the taste of everyone.
READ MORE: Review: Anycubic Vyper 3D Printer – easy to use and easy on the eyes
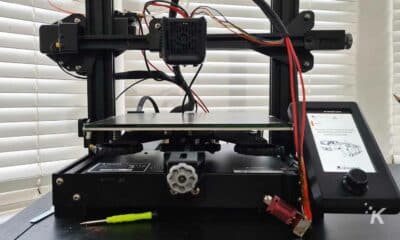
The Anycubic branding is stamped on the front of the colorful top cover, with the printer platform in silver and the base is black. The platform has a build volume of 130mm, 80mm, 165mm, a more generous length and width than some of the other products offered by the brand. It weighs 4.5 kilograms.
The controls for the printer are on the base, with a 2.8-inch touchscreen for accessing files on the USB driver, which can be inserted USB slot on the back, left of the base. The on/off switch is located next to the USB slot.
How does the Photon Mono work?
As this 3D printer would probably be more for beginniners, let’s tackle how the 3D printer makes its models.
A maker takes a computer-aided design (CAD) graphic and uses software to “slice” it to create “layers.” For Anycubic machines, the company has specific software to help with cutting these designs—Anycubic Slicer Software.
The maker then needs to export the CAD design into either:
- Initial Graphics Exchange Specification (IGES)
- Standard Tessellation Language (STL)
- Standard for the Exchange of Product model data (STEP)
The file is then placed onto a USB driver, which is inserted into the driver slot on the 3D printer. Once the printer is calibrated to the specific needs of the design, the maker will wait until all the slices are printed to create a 3D model.
3D printers use different types of materials for models. These include:
- Plastic
- Powders
- Resins
- Metal
- Carbon Fiber
- Graphite and Graphene
- Nitinol
- Paper
The Photon Mono uses 405nm UV resin. You can buy the resin in 500 grams or 1-kilometer bottles. Using a UV laser, the resin is turned from a liquid into a solid, layer by layer.
How do you set it up?

Ensure your machine is in an area that can’t be accessed by small children or animals if you leave the room during printing. I have both, so I chose a table in the corner that both couldn’t jump onto. The test print alone takes nearly 4 hours so you might need to make a couple of trips for food and drink while you wait, so it’s imperative that sticky fingers don’t have the chance to become covered in resin.
Once I unpacked the box and removed all accessories, I instantly realized how easy putting together the machine was. All I had to do was insert the plug connector into the back of the printer base, switch on the power and move the switch on the side of the base into the “on” position.
Of course, you have to calibrate the machine to make sure that there’s enough room for the model to be made; I tried it without doing this and you hear a lot of scratching and squeaking when trying to print.
Once the touchscreen comes on (on the machine’s base), select “Tools,” which is the third option in the menu that appears. Select “Move Z.”
In this next step, you’re looking to raise the Z-axis to 10mm. Select this option on the touchscreen and then press the up button on the screen. The axis will move upwards automatically.
Next, loosen the printer platform’s four screws and slide it into the Z-axis. Secure the printing platform by turning the large, black screen on the axis. Place the leveling paper on the curing screen and select the “Home” button. The z-axis will move downwards and stop automatically—once this happens, press gently onto the printing platform and tighten the four screws.
Return to the “Tools” menu and select “Z=0” to confirm the zero position of the axis. Continue to press “Enter” when prompted and the platform will lift once more to a certain height. Remove the paper.
To install the resin vat, slide it between the slide bars of the printing platform, tightening the screws to the middle holes.
This process took me, at most, 30 minutes and it was relatively easy. The instructions are visual so there was no room for error.
The included USB comes with a test print so I thought it would be best to try this out. I inserted the USB driver and pressed “Print” on the first menu. On the next menu, select the test file and press the “Play” button.
I then had to find things to do over the next four hours while I waited for the test to come out. It’s a cube and it gives you an idea of how long a small model will take, depending on the different layers.
Should you buy the Anycubic Photon Mono?
If you’re into engineering, design or the latest technology, but don’t have advanced skills then this 3D printer is the one for you. If you’re also looking for something to impress your kids with, then they’ll be thoroughly excited by this.
This printer is so easy to set up—a lot easier than it was to put up IKEA shelves. The instructions are simple and there’s hardly any room for error. Also, because it comes practically set-up apart from a couple of bits, you’re up and running within 30 minutes.

If you have animals or small children, this won’t be for them. My toddler was more interested in pushing it onto the floor than watching it make the cube. My dogs wanted to eat the resin.
So for those people looking for quick entertainment, think again—the machine has a printing speed of 50mm per hour maximum and doesn’t make for riveting viewing.
The only issue I found with this machine was that there wasn’t really any guidance on what to do after the test print. No ideas provided for finding files—if you’re a beginner, you can find free or paid files online. Here at KnowTechie, we were provided with a cute print for Christmas, but other than that there was nothing else exciting to print.
Overall though, if you’re looking into an entry into 3D printing, the Anycubic Photon Mono might be the machine for you. Just don’t make the same mistake I did after the test print… scrap the excess resign on the printing platform away or you’ll have some interesting noises during the next print.
Editors’ Recommendations:
- Review: ELEGOO Mars 3D Printer – Plug and Print
- Review: The Yeedi 650 is a terrible entry-level robot vacuum cleaner
- Review: Meze Audio Rai Solo IEMs – punching above their weight
- Review: Toybox 3D Printer for kids – a solid 3D printer for the price
Just a heads up, if you buy something through our links, we may get a small share of the sale. It’s one of the ways we keep the lights on here. Click here for more.
Follow us on Flipboard, Google News, or Apple News